Find a Showroom
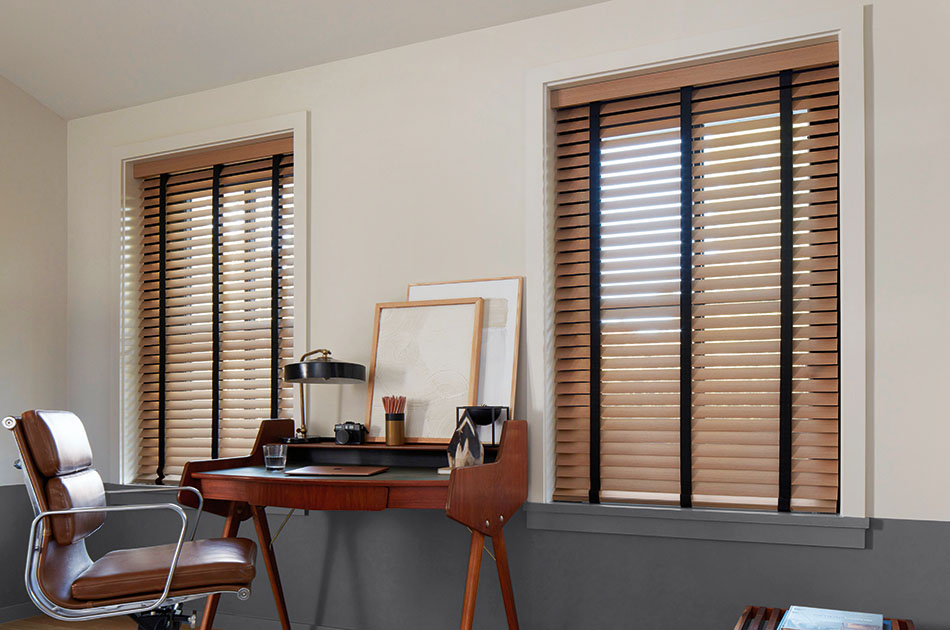
How to Install Blinds Step by Step
Learning how to install blinds — those with horizontal, tiltable slats that is — is a relatively straightforward process that can often be DIYed. Installing blinds, for the most part, is similar across brands and product lines, however, the steps outlined here are specific to Wood, Faux Wood and Metal Blinds purchased from The Shade Store. While we highly recommend relying on our professionals for measure and installation of our Blinds, you can likely install them yourself if you’re comfortable doing so.
Learn the steps and best practices for how to install blinds to help you determine whether you’re up for the DIY job.
Installing Blinds: Steps & Best Practices
Installing blinds is a relatively straightforward process. These steps and best practices for how to install window blinds are specific to Wood, Faux Wood and Metal Blinds from The Shade Store but most blinds will have very similar installation steps.
consult the Install Guide
Before you begin the process of installing blinds, be sure to familiarize yourself with the installation instructions for The Shade Store Blinds.
READ THE GUIDE
Step 1: Decide on Inside or Outside Mount Blinds
The first step for how to install blinds is deciding on your application type: inside or outside mount? The answer will dictate how you measure to order your blinds as well as how you install the brackets for your blinds.
What Is Inside Mount?
Inside mount refers to blinds that are installed inside the window frame, with brackets typically secured to the sides or “ceiling” of the window box or frame.
What Is Outside Mount?
Outside mount refers to blinds that are installed outside of the window frame, either on the wall above the window or from the room’s ceiling.
Step 2: Gather Tools
The next step for how to install blinds is to gather the tools you’ll need for measuring and installation. These tools are all very common and you likely already have most on hand. If not, you can find all of these at your local hardware store.
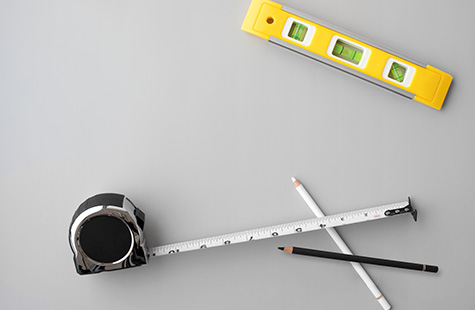
common tools for installing blinds
Be sure to check the installation guide for a specific list of tools needed for your chosen blinds, but typically, the list will include:
- Pencil
- Tape measure
- Level
- Stepladder
- Phillips screwdriver
- Drill
Do You Need a Drill to Install Blinds?
For specific steps for how to install window blinds, a drill is very helpful to have. It makes installing brackets much easier, as it can be used to bore pilot holes into the window frame or wall, but it is not essential. You can likely use a screwdriver alone to install your brackets, it’ll just take a bit more time and effort.
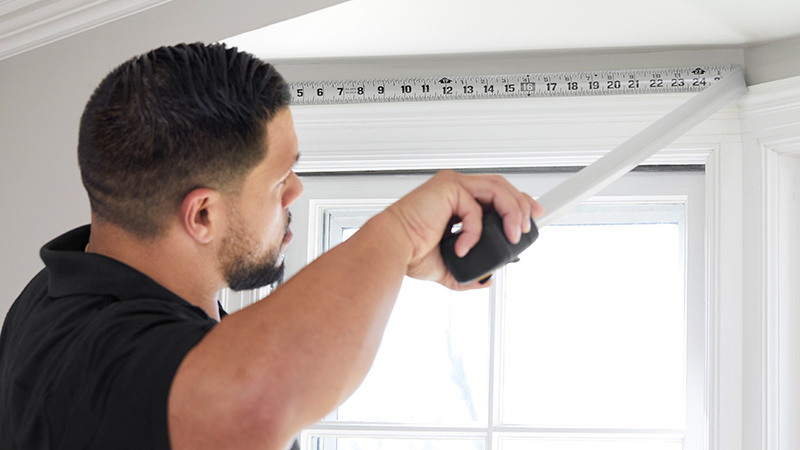
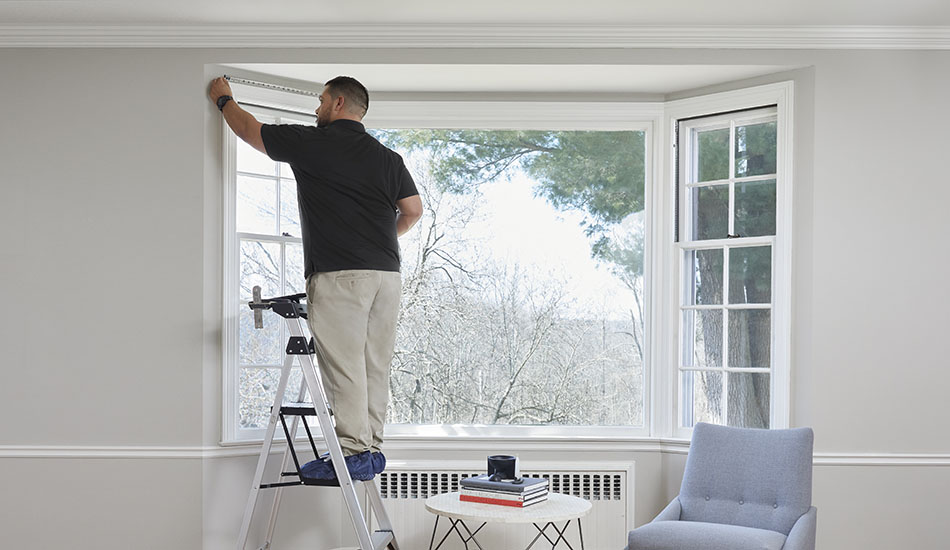
Step 3: Measure for Your Ordering Width & Length
The next step for how to install blinds, measuring for your ordering width and length, is especially important when you choose custom Blinds, like those from The Shade Store. This is because custom Blinds are tailored to fit your window and application. If you decide to go with premade blinds, measuring is still an important part of how to install window blinds, as it helps you choose the closest premade size to your measurements.
Measuring for your blinds will vary based on whether you’ve chosen an inside mount or outside mount application. To measure appropriately for your blinds, follow the below instructions for each application:
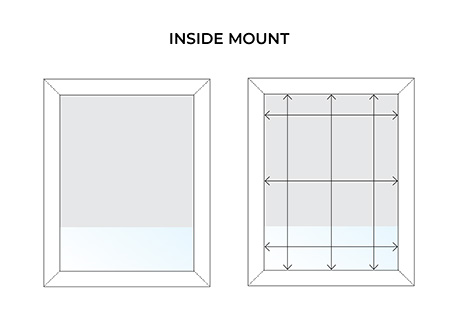
measuring for inside mount
Measuring for an inside mount application will require three measurements each for length and width. This is because no window is completely square, so measuring three times helps ensure your window treatments will fit correctly.
For length, measure from top to bottom on the right side of your frame, then in the middle, and then on the left side of your frame. The longest length of these three will be your ordering length.
For width, measure from side to side starting at the top of your window frame, then the middle, and then the bottom. The shortest width of these three will be your ordering width.
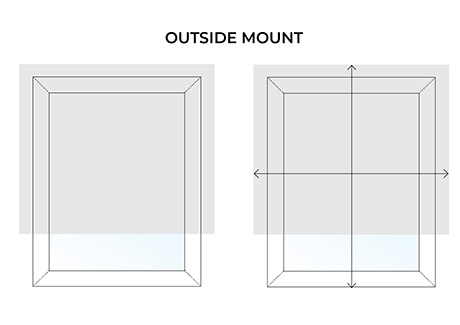
Measuring for Outside Mount
Measuring for an outside mount application will depend on how high above the window and how wide beyond the window you’ll want your blinds to extend.
For length, measure from where you want your blinds to start on the wall above your window, or from your ceiling, down to the bottom edge of the window frame.
For width, measure the width of the area beyond your window’s width that you want the blinds to cover. Be sure to center your measurement so the extension beyond the window frame is equal on both sides.
Step 4: Mark Bracket Placement
Once you place your order with the measurements calculated in Step 3 and receive your custom Blinds, the next step in how to install blinds is to mark where the brackets will be placed. Just like measuring, the process for marking bracket placement will vary slightly based on whether you’re inside- or outside-mounting your blinds.
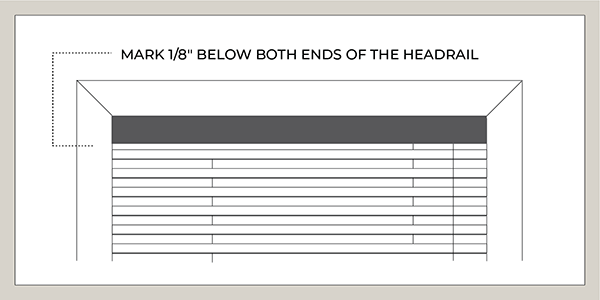
Inside Mount Bracket Placement
To find bracket placement for an inside mount application, hold the blinds up inside your window frame and mark 1/8” below the headrail on each side. The bottom of the installation brackets will be placed on those marks.
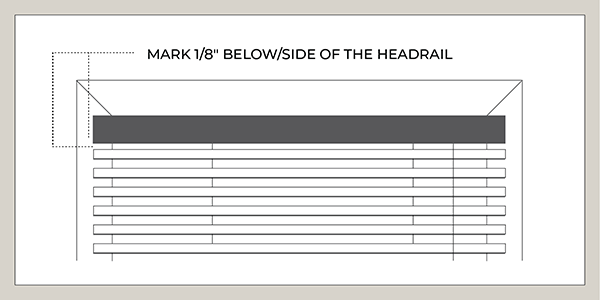
Outside Mount Bracket Placement
To mark bracket placement for an outside mount application, hold the blind level and center against the wall, window casing or ceiling. Mark the wall, window or ceiling surface with a pencil just below the headrail on each side, as well as 1/8-inch beyond the ends of the headrail. The installation brackets will be placed within these marks.
auxiliary brackets
If auxiliary support brackets are needed for your inside- or outside-mounted blinds, this bracket should be placed in line with the installation brackets and centered between them.
Step 5: Install the Brackets
Once you mark the placement of the brackets, you’re ready to move on to the next step for how to install window blinds, which is installing the brackets. Brackets will be secured to the wall or window frame with two screws. These two screws can be used in several different orientations depending on your mounting application.
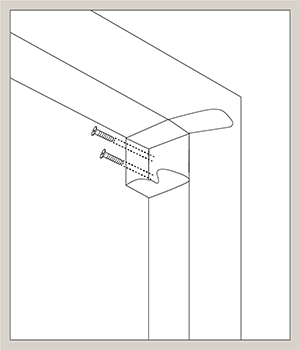
Bracket Install A: Inside Mount
For an inside mount application, one option for bracket placement is to fasten the screws into the side of your window frame in a horizontal orientation where the screws are side facing.
Bracket Install B: Outside Mount
For an outside mount application, one option for bracket placement is to fasten the screws into the front of your window casing or into the wall outside your window frame in a horizontal orientation where the screws are front facing.
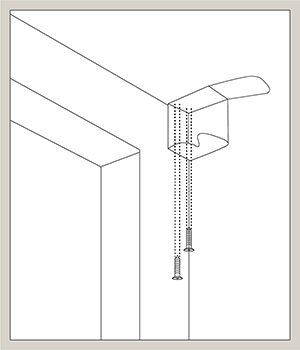
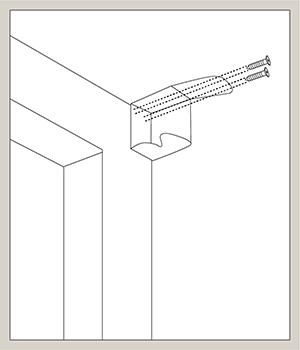
Bracket Install C: Inside or Ceiling Mount
For either inside or outside mount applications, you also have the option of fastening the screws into the “ceiling” of the window frame or into the room’s ceiling above the window in a vertical orientation where the screws are upside-down.
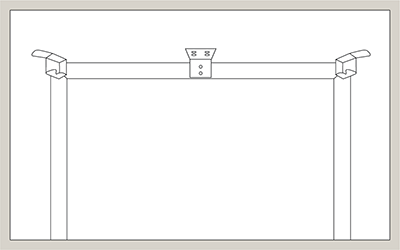
Auxiliary Bracket Installation
If your blinds also came with an auxiliary bracket (center bracket in the diagram), make sure to place it in line with the installation brackets, centered between them. However, it should not be directly in line vertically with any of the blind’s ladders as it may interfere with the lifting and tilting mechanism.
Important
Before fastening your brackets, be aware that they must be securely attached to the mounting service, meaning they must hit wood studs or the wood beam of your window frame. If they do not hit studs or beams, you’ll need to use a drywall anchor, which can be found at your local hardware store.
Step 6: Install the Headrail
Once your brackets are securely fastened, the next step for how to install blinds is to mount the headrail. The headrail is the top part of your blinds from which the slats fall, and it also contains the mechanisms that allow you to lift, lower and tilt your blinds.
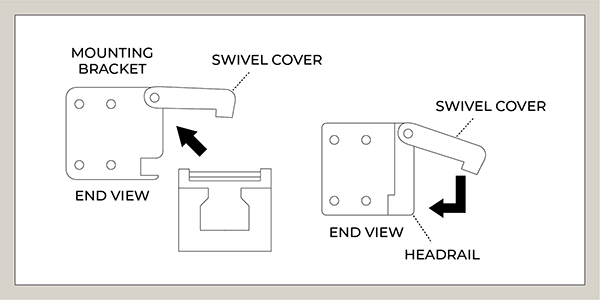
Mount the Headrail
To mount your headrail, lift the swivel covers on the installation brackets, and auxiliary bracket, if applicable, and insert the headrail into the brackets. Close the swivel covers once the headrail is placed, and it should be securely mounted.
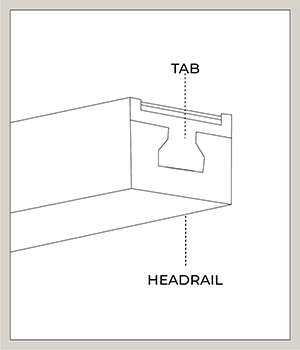
Troubleshooting an Insecure Fit
If your blinds are not fitting snugly, remove the headrail from the brackets and pry out the tab at the end of the headrail with a screwdriver. Then, re-install the headrail.
Step 7: Install the Valance
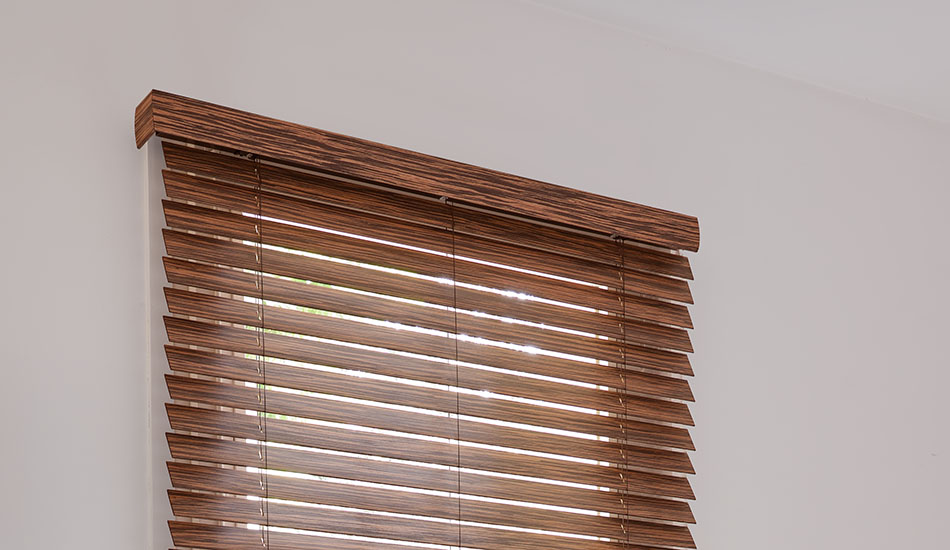
After headrail installation, you have a few smaller steps to complete for installing blinds, including attaching the valance. The valance is a decorative piece that attaches to the front of the headrail to hide it and present a more pleasing aesthetic. When it comes to steps for how to install blinds, valance installation will vary slightly based on whether you have Wood Blinds or Metal Blinds.
Wood Blinds Valance Installation
For Wood Blinds, the valance features magnets that attach to the metal headrail. Simply hold the valance up to the headrail and let the magnets connect to the metal.
Metal Blinds Valance Installation
For Metal Blinds, there are a few steps to properly attach the valance:
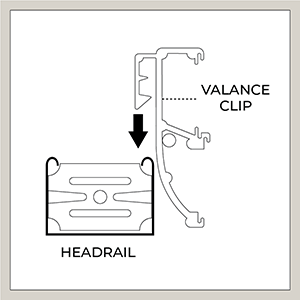
Step 1: Attach Valance Clips
Slide each valance clip by sliding it downward onto the headrail.
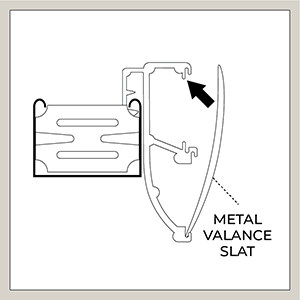
Step 2: Insert Valance Slat
Insert the metal valance slat into the valance clips by first inserting the bottom of the slat into the clip and then inserting the top.
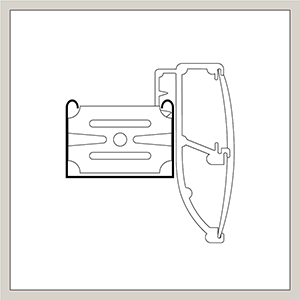
Complete: Side View
Properly installing the clips and slat will give you a sleek, attractive Metal Blinds valance.
After completing all the above steps, you may be done with installing blinds based on the type of control mechanism your blinds feature. For cordless lift blinds with a wand to tilt the slats, you may still have another step to complete.
Step 8: Attach the Wand (if Applicable)
Wands are not always part of the steps for how to install blinds. These steps are only applicable for Blinds with Cordless lift control, as they will come with a wand tilt.
Attaching the Wand
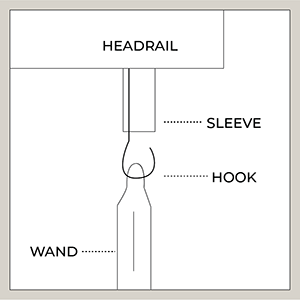
Step 1: Thread the Wand
To attach the wand, simply thread the wand on the hook.
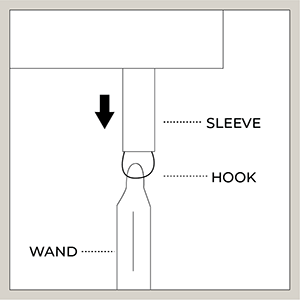
Step 2: Lower the Sleeve
Lower the sleeve to cover the hook and trap the wand in place.
Ensure Your Project’s Success with Professional Help
Now you know the steps for how to install blinds, you can decide whether or not you’re up to the challenge of DIYing the installation. If you choose custom Blinds from The Shade Store, you have the option of relying on our professional team of experts for both installing blinds and taking measurements. We offer free measurements for your convenience so you can be sure your blinds will fit perfectly. Schedule a free measurement today to start your project on the right foot.
SCHEDULE A FREE PROFESSIONAL MEASUREMENT
Ensure your window treatments fit perfectly when you schedule a free measurement with our expert professionals.